Saturday, December 24, 2011

Now, a house starts to emerge

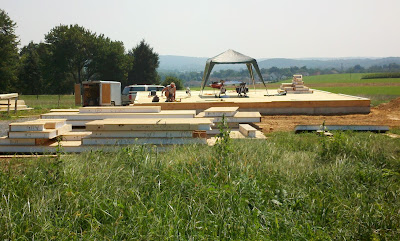
So on August 20th, we began. Safety first: cover any "holes" (like this hatchway to the crawl space).
Set up a shelter against the blazing sun.

And start by striking chalk lines to mark the wall edges, and designate those areas for door openings that would not have wall-sills ("no glue")

Checking to make sure everything was square (we'd had lots of rain, so swelling was a concern), and marking these access points, as well as marking off and drilling for electrical wiring access, took most of Saturday.
Note the 2x6" sill, which has been glued/screwed onto the deck. Note also the 1/2" ledge that the outer skin of OSB will rest on. The bottom of each panel is channeled to fit over the 2x6, and the base of each panel is glued and nailed to the 2x6 (both inner and out skins). Even though there is a 1" channel for electrical wiring drilled horizontally through each panel (to run outlet boxes), we thought it might be easier just to feed up from the crawl space. Note the holes drilled into the crawl space below deck ("duplex outlet" symbol drawn in lower right).

This is the first panel being raised. It was assembled from 4 pieces: 2 sides, a bottom, and laminated veneer lumber header to support the load over this 100" wide window.

And so it went until by the end of the day (3-ish, after all it was Saturday and the builders had worked all week), we had our first corner built. This is Bob, Robin, Eric & Terry--picture courtesy of Eva, Bob's wife, and erstwhile provider of snacks and iced teas!

Dec 24 2011 Updates

We've had several people ask us why our blog hasn't been updated. Well, we've been so busy building the house (in the small spaces leftover after we've done our real jobs) that we haven't had the time. So in the coming day, during the break between semesters, we'll bring you up to where we are now...

Friday, October 14, 2011

Happy Birthday

What's a better 50th birthday present than a new house! We finished the first floor deck on Eric's birthday...

And while we were doing that there arrived...


The entire house was packed like a puzzle into one truck. here Robin on the panels) and Terry (in the skidloader) are unloading the panels and sorting them (the letters and numbers correspond to labels on the engineer's drawings), while Julie and I finished the last row of decking. Be careful! Poor Julie stepped on an unsecured short piece of subfloor and went straight down--very unsettling! Fortunately, nothing was broken.

Then Terry used the loader to push dirt back into the ditch around the house, while we set up for the build. Having a solid earth surface to work from while we got started on the first floor walls was important for safety and efficiency. This took the day.

Saturday, September 17, 2011

Codes

So we have the inspector over, basically 12 hours before we're to start backfilling the foundation for the next phase. We have half the subfloor on. I say, "Well we don't want to violate any codes." And he says, "You already have," and chuckles.

Of course we're quietly freaking out.

Turns out that foundation inspection is supposed to be done before any framing is done. But of course we put off the damp-proofing and installing the French drain because we were too doggone busy. We figured that as long as it wasn't backfilled, we were ok.

But he was a good guy about it, and patiently schooled us in how things were to be done in a certain order. Inspection passed.

Building "Up"

Man o man we needed that vacation. Hey, we know we're not going to get done before school starts, so might as well make the best of it. Here's what greeted us on our return.
I don't think we really did any work that day. Some moments are meant just to enjoy.


Aug 12: Back to reality. We've got a number of joists in place, and have started to load 3/4" T&G decking onto the platform. There's a house comin' out of that hole!


Julie using the nail gun to fasten a rim joist. Check out those muscles.
The mason had finished the parging (in 4 hours!--money well-spent). Here you see the bituminous damp proofing applied to one outer wall. Note that the grade line is about 12" below the framing.

Aug 18: We're really hustling. "Panel day" is tomorrow! Robin & Terry Loughran from Bridlewood Builders are coming to unload and start erecting the first floor walls with us. much of the foundation needs to be filled in, so while Eric worked on subflooring, Julie worked on building the French drains. The thin orange marker driven into the gravel marks the end cap of the well access tunnel, seen in an earlier post as coming up thru the concrete slab on the northwest side of the crawlspace.  
Here's a completed section.

 
Here's 4" slotted pipe emerging from the lower end of the northeast side.

When installing decking for the walls, the tongue has to exceed the edge of the rim joist, because the panels have to sit on a solid 3/4" of decking. Stagger joints in each run. Bring on the building inspector!

Some updates

Ok, we're behind, but to give you a sense of where we've been...
July 26th: the mason grouted the holes in the block every 48" and sunk a 16" J-anchor. Jeb & I drilled and bolted down the pressure-treated mudsills to cap the block wall. The Monday after, this is our first lumber delivery.

These are the "LVLs"--laminated veneer lumber. Essentially giant plywood beams. These things weigh a ton. At 16' & 24', it took 4 of us to carry them over and place them inside on temporary block columns.


July 29: We are getting close to our vacation in Cape May and we're not quite where we want to be. (somehow we'd imagined the house would be under a roof by then)
Props to Jeb. He drilled 39 1/2" holes 6" into the concrete pads (I drilled one, just to try it). Tip: hammer drill of any size beats big half-inch rotary drill! Julie's workin' the Styrofoam (see previous entry).


July 30: Beams are in but yet leveled for the floor joists.
Beam pockets of my own design. J-hooks mortared into the holes and bolted to heavy duty angles, with beam thru-bolted. Concerned about getting the beams positioned just right, I designed something super-strong but with room to "adjust" for any errors (which, we, learn, are inevitable).

Pressure treated lumber base with 1/2" pine shim to bring level with the mudsills (top left).


August 2: Eric & Jeb decided to try parging the outside of the wall. Meant to protect the block and mortar from moisture and mechanical damage, and provides a substrate for the damp-proofing. This was 45 minutes and small mixes of mortar. Once again, I'm thinking of a certain mason...

Meanwhile...
We installed level lines in 3 places across the beams.

Here's a close-up. Then, we're told, take a 2x4 piece and slip it under the line as it crosses each beam. If the beam's low, there will be a gap between the wood and the string (which must be bar-tight). If the beam's high, it'll push up on the string.

The joists in the background...first I did some layout. Here's a close -up:

This, we're told by our builder-consultants, is best done by one person--minimizes errors. The right-edge mark is 15 1/4" for the sill edge. X marks the joist, so it sits 16" on-center. This had to be done on 2 sills and all beams. Ok, maybe this seems like everything was going on at once that day. It was.


Under the steel columns note the little thin black composite shims to bring the floor level. Composite is preferred over cedar shims, which are too soft and still a little moisture prone. 3 of the columns were too high. Concrete block temporary columns were placed, and the long columns were unbolted and sent back to the steel fabricator for shortening.

And finally, a sleeve of 6" drain pipe, set in place at a slight downward angle with hydraulic cement. This was taken before the outside was filled.
A particularly busy day. And then we left for Cape May (Yay!)

Thursday, September 8, 2011

The Styrofoam Puzzle

Anyone who knows me well knows that I care a great deal about the environment. Hence, I mostly avoid using Styrofoam when I can. I realize it has many wonderful uses, but I believe we use it way too casually. It is not a good candidate for recycling, even if you can find a place to do so. So we drink our take-out coffee and take home our doggie bags, while our landfills fill with plastic puffy stuff that will outlast all of us. In order to do my part to reduce Styrofoam use, I go to the extreme of carrying my own containers to restaurants to take my leftovers home. A little eccentric, but satisfying.

Why am I telling you this? Well, let me start at the beginning. Many months ago, when Eric started making a list of supplies we would need, one of the things he listed was sheets of 3-inch Styrofoam. This was for insulating the inside of the crawlspace wall. One layer of Styrofoam and one layer of drywall. We need insulation because the crawlspace will be heated/air-conditioned (since the ductwork and some of the plumbing will be there). We chose the Styrofoam/drywall solution based on the lower cost, as many of our decisions for this project are. Of course, my first reaction was Styrofoam!? But I bowed to the wisdom (and thriftiness) of the choice.

Way before we started construction, we started scanning the paper and Craig’s List for used items. Last year Eric discovered someone selling second-hand Styrofoam from a factory demolition. How could I refuse! It was half-price, thus saving us even more money. Plus, we wouldn’t be using any new Styrofoam. Yay! I could use it with a clear conscience.

However, transporting it wasn’t easy, so we tied it up in the back of the pickup truck (did we tell you we bought a junker pickup for $1100? We call it Mr. Rattles). Unfortunately, as you know, Styrofoam is very light, and on the way, some of it got caught by the wind and blew off the truck. We collected it all, but by the time we got to the storage locker, some of the pieces were broken and some had been run over by passing vehicles, so had tire marks on them.

Fast-forward to July. It’s time to glue the Styrofoam in, and the broken pieces have to be fitted back together, and we have to figure out how it will fit around all the walls. Eric said, “This is a perfect job for you,” because I like to do puzzles, and he doesn’t. So Ms Anti-Styrofoam spent a week organizing, carrying, cutting and gluing Styrofoam. Probably more Styrofoam than I have saved, pound for pound, in my entire life! (Which made me question the value of my anti-Styrofoam activities) Actually, it was kind of fun. Most of the pieces were intact, and it was just a matter of cutting them to fit the walls.

The whole pieces were eight feet long, but much higher than we needed, so I had to trim them to fit. (Got a nasty blister on my finger from cutting them!) And there were shorter and broken pieces, too, as you can see.


I spent one morning mixing and matching the broken pieces until I could see where they fit together. Once I figured out where each piece was going to go, I started gluing them up. Unfortunately, it’s been a rainy year. So I’d glue some down, go away till the next day, and it would rain. When I’d come back the next day, some of them would’ve fallen down. Arrrrrgh! I finally got them all up, with the backers nailed into place.

Ah…the backers. In between the pieces of Styrofoam you have to put wooden backers, so you’ll have something to nail the drywall to. And how, you might wonder, do you nail pieces of wood into concrete blocks? With a Ramset. A Ramset is an awesome gun that shoots nails into the wall. You load a nail onto the end of the gun, then you put a (small) bullet into a little chamber. Then you position your gun and hit the end of it sharply with a hammer, and BAM, your nail gets forced into the wall. Very noisy (yes, I wore ear protection), and kind of tedious, since you have to load each nail and bullet separately, but very cool. This project is constantly reminding me of how clever people are for thinking up tools to do specific jobs perfectly. Forget “There’s an app for that.” My new phrase is “There’s a tool for that? Cool!”

So the Styrofoam is up, and here’s a picture of a finished wall. It’s braced until the glue dries.

 
We will put the drywall up after the house is under roof, so that it won’t get wet. Of course, this means we’ll have to nail the drywall up while sitting in a 36-inch crawlspace. Oh, well. There are lots of tasks where you think, “I don’t want to do that,” and then you do it anyway, because you have to. I’m glad this one is done!

Monday, August 22, 2011

Ok, that was fun, but...

The concrete block work was an experience, and one we chose not to finish by ourselves. We' gotten about this far since July 1...
So that one night as we drove home, and it's like the 21st of July...we had only laid about 300 blocks out of 540 or so needed. This was going to take forever. We learned what we came to learn. We tried it out and weren't too bad at it, just really slow. So I said to Julie, "What do you think a mason would charge us to finish this?"

We found this fellow, Joe Staudt, doing work on our neighbor's house in the city, and he did a nice job. So we called and he agreed to do it for a modest price--we are trying to save money with this project, so this seemed like a no-brainer.


Here, he's set up. He has a small concrete mixer. This guy busted a whole bag or 2 at once, kept several trays going, ran mortar over long lines of blocks, and just generally had all the techniques that amateurs just don't have. He had the rest up in 6 hours...


Note the beam pockets. Note the thick mortar course! We got it square and plumb, but were having difficulty getting the centers of the runs to come level. This was because the footer tended to sag in the centers, maybe 1/2" to an inch. That may have been poor leveling, or could have been the forms themselves, as it was sometimes difficult to get our wooden forms to stay level. In the end, though, it was fixed.

This has been a lot about learning how to fix things.

Long-overdue updates

We've been very busy--so busy we haven't blogged! But we have lost of pics and a few tips. So over the next several days we'll post the progress so far.

Sunday, July 17, 2011

...and more block...

This is hard slow work, especially for the unschooled. At mid-July, we've got about 1/3 of the blocks in place. Our friends Jeb and Pat helped us a lot today (Saturday July 16). Pat's been filling in gravel for the French drain, and mixing mortar (1 part concrete to 3 parts yellow sand--adjust water accordingly, as wetter mortar sticks best to the sides of the block and drier mortar makes a good bed when adjusting to inconsistencies in the footer). Jeb and Julie and I laid block. Then we had a picnic.

Beer & wine optional.

Unlike the digging, the forming, and the scrambling around trying to spread wet concrete, this would seem easy. Just sitting on a block slapping mortar on other blocks. But there's the sun, the mixing, the lifting, and the occasional thrown trowel whenever blocks defy our efforts to get them staright and level. It adds up. We've begun to realize that this is going to take a while--so we took the next day off!

Concrete Block

On July 1 we began to realize that we probably wouldn't be able to get the house under roof by the time we go back to school in late August. Here we're getting the block delivered...
This was pretty slick. Each "block" has 90 cinderblocks, and the teeth on the crane grab the bottom layer--this saved us a "pallet charge", which is a deposit on the wooden skids often used to deliver this material.
This guy was good. He placed the blocks so that every area would have a supply, thus we wouldn't have to carry blocks too far to any given point. He also kept a stright line clear between each diagonal corner--so we could run level lines to check that each corner or "lead" was square and level with one another.

Over the weekend my friend Jeb and I ran a dry course for fit...
Here's a close-up of the mason's lines. We ran these to corner posts, which were easier to work with than batter boards (because of the tight space around the base of the foundation). These are set level 8" above the footer and checked with each other and across the corners...
Then Julie and I put up the leads, and this set the stage for filling in the remaining blocks...

 This lead is too big. It should just be a corner, but I miscalculated. Still, no harm done, and it was satisfying, even if it's not too pretty!

 Here you can see the 2 more of the leads as we're working to get the first courses mortared in place....

A Solid Footing (2)

So to minimize moisture and maximize "comfort" working in a 36" crawl space it was recommended that we have a solid concrete floor. Here are the stages, including moving 10-1/2 tons of 2b gravel from a pile to the floor of the crawl space..., because the truck couldn't get close enough to dump it inside.
That's our friend Pat and my nephew Rich, hard at work. (They're smiling because we're almost done.) And here, probably the best this thing has looked since we started...
Then onto the vapor barrier. This was a 6 mil thick plastic anchored to the edges and joined at the seams with "Gorilla Tape"...
You can see the access for the well water intake in the foreground.
And finally, the concrete floor. Here we had the driver mix it up very wet, the easier to spread it around. It was at this stage that our amateur status really started to "shine"...
We had been worried that a forecast for early heavy rain would cause problems, and that we'd have to reschedule. But the rain held off. This is still "green" (not fully dried), and you can see the bridges of 2x12s we'd recovered from the forms. These are what we used to get into the middle and hand-finish the surface.

This photo is captioned "Not Great but Good"--the wrinkles and ridges shown here would remain. Eric had rented a tool called a bull float, which is a like a giant magnesium squegee that weighs about 15 lbs. and comes with a pole 15' long mounted to the head with a toothed locking swivel.

Unfortunately, this thing gets really heavy, and can actually stick to and get caught in the wet concrete (if you're not very good at this!)...and Eric broke the swivel. That meant we had to finish the floor by hand. The sun came out and it was HOT! We darn near got heat stroke, and didn't even manage to finish it all. But it's fairly level, and actually sufficiently smooth that it will work. Good thing very few people will ever see it once the house is up.

This is not as easy as it looks

We haven't posted much since mid-June, because we've really been hustling to get to the point where we have a solid deck for the structural insulated panels (SIPs), which we had hoped to have delivered and erected by now.

But this is a big project. Here's the 1st pour:

Honestly, the driver was awesome...look how close he got! He came in at each corner, and the chute managed to reach all the pads in the center, as well as the footer itself. This spared us trying to catch concrete in a wheelbarrow and trundling it over to pads that were farthest from the perimeter. We'd read about "slump" and "psi", but this was real, and the driver was good at guesstimating the "wetness" of the concrete that would allow us to spread it quickly while maintaining strength. 4000 psi was specified for the pads, and 3000 psi for the footer. But we worked out that we could save delivery charges, and get both trucks (12-1/2 cubic yards) with a 3500 psi mix, since we thickened the pads and footers by a couple of inches.

Here one of my nephews, Trevor, helps to move wet concrete in the footer form to level it off.

And here's a finished section along the east side of the house.

Here's the deal: concrete comes out much faster than you expect, and it hardens much faster than you're ready for!