Sunday, October 6, 2013

Spring of 2012: The Hobbitt Door and the Window Seat

As the weather warmed, one detail we added to Eric's "hobby" was the construction of a round "Hobbitt Door" we envisioned for the front of the house. This basically had to be built from scratch. To avoid a door with custom iron hinges that would weight perhaps 400 pounds, we came up with a design that appears to be a solid single round door from the front--until one goes to open it. Then, only a standard, arched 36" wide door drops into the house on its swing. Here's the cedar outer skin being built.
Then I flipped it, cut it into 3 sections (the door itself and the fills to the sides), and then framed the interior to be hollow and insulated with R-5 Styrofoam.


The porthole was to let some light into the entry hall...and it just looks cool. The process took some months, as Eric would find time for this when he could. Note the electrical switch boxes for the outside porch light and the entry hall light to the left of the side of the door that will be latched.

Also during the spring we started the window seat next to the master bath bathtub. The idea was to add some architectural relief to the front of the house, while adding a nice little feature next to the bathtub. One could fill the bath, turn on the whirlpool, open the windows and light some candles on the window seat. Very relaxing!

But actually framing the thing some 15' off the ground? That didn't seem like very much fun. So here's how we did it. Here, Eric frames the basic shape.

We're looking at it with it's exterior face down on sawhorses. The little angled blocks are for a short pitched roof, and the long "tongue" of framing facing up to the top of the photo is the upper anchor. The idea was to build this so that it could be hoisted into place, "dropped" sideways onto the opening in the large square hole master bathroom, and come to rest against the house with the tongue sliding against the header over that opening. Then it could be nailed and bracketed to the framing members around the opening.

Here are our neighbor Albert with Julie on the ground. Our friend Jeb is in the opening. he has a nail gun ready. This shot is taken from the front seat of the Jeep by Eric. The ropes go from the bumper hooks on the jeep, up to 2 blocks screwed into the roof framing, and then down to heavy eyelets bolted through the frame of the window seat.
Note the roll of Tyvek taped fast at the top of the unit. This is so we can just go up afterward and unroll it, and staple/tape the vapor barrier fast to the rest of the Tyvek already in place for a good weather seal.

Here's Julie shouting directions as we try to keep it level on the hoist .
 And up she goes...


Note that Eric's viewpoint is to the right now, having steered to get extra slack out of the one side.

Jeb and Albert adjusting and fastening.


And the finished product, awaiting the windows, which by then were on order from Pella.


In our next episode...ELECTRICITY!

"Guts"

The winter of 2012 was a time to basically work on running wiring, plumbing.  This continued through the next year. Of course, heating became important...
This was actually fun, patient work. Kind of like a hobby. And frankly, unless the owner-builder looks at such a project that way, you'll get very discouraged. So this was the fun thing Eric did for relaxation.
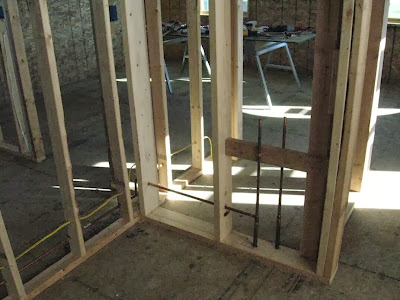
Here's a detail of the beginning of the shower supply plumbing. The cold supply is on the left and branches to serve the WC. There's a closet behind this, so we can cut access to the shutoffs without it marring the wall of Eric's office.


Little Bits of Progress

Winter 2012. Installing interior walls. Note the bracing, and the Tyvek that still covers the hole in the front of the house for a future window seat installation in the master bath.
Julie installing an electrical box in one of the SIP walls. With these "structural insulated panels" you have to plan any electrical runs ahead before you put the shell together. Careful to make sure they are tight and square!

Copper pipes--old school! (I swear, the contractors and inspectors we had in later, before we closed in the walls, all said this. "Oh, copper! That's old school!" I'll add that they said this admiringly. Note the joints, sweated with solder. We could have used "Sharkbite" connectors, but those can run from a $7 dollars apiece for a simple connector to over $15 for a valve connector. A plain sleeve-type T-connector runs maybe $2-3 + pennies for the solder. We reserved Sharkbites for valves, and some final connections to the incoming water supply.
Here's a Sharkbite valve of the type we installed for the system shutoffs in the crawl space.
Nice and easy. Just clean up the end of the pipe, insert and you're done. For us, though, saving money--and the satisfaction of admiration for having attempted our connections the "old fashioned way"--led us to keep these to a minimum. Sweating a joint on a valve does run some risk of damaging the valve components and seals (for amateurs), so that was one driving factor to using these for valve connections.
And then there's always more wiring to run. Here's Eric putting in the 20-amp service to outlets for the upstairs bathroom outlets.
Be sure to keep the run-holes at least 1-1/4" from the edge face of the stud! This keeps drywall screws from digging into wires and pipes.

Wednesday, May 15, 2013

10-50-90 Rule

So in the last post we were closing in, and we showed some pics of the window installations. Thence ushered in a period of interior work as winter set in.
But it looks like a pretty snug place to work in, right? This was taken in January 2012.
Much of the next...maybe...6 weeks was spent finishing most of the interior framing. The load bearing interior framing had already been done (seen in an earlier post). So this was just partitions bearing no load.
Here you see the arch over the stair--this was actually Jeb's idea, when we were sitting around wondering how to cut this out of the SIP so we'd stop bumping our heads on it.

This is a little farther along. About 85% of the interior framing is done--the partition walls--and so begins what I would come to term the "10-50-90 Rule". Much of the next year would be devoted to the fine work of installing wiring (Julie shown admiring our work in the master bath here), plumbing, and cabling for network, TV, etc. What's the rule? It goes like this: these installations are 10% of the mass of the house, 50% of the cost, and 90% of the time!
Of course, that's not all we did for the next year, and in coming posts we'll document other things we did to move the house closer to being a house we can live in.


Sunday, March 17, 2013

Closing In!

So, onward...
Closing in the is process of getting all the holes closed--doors and windows--ans wrapping the house in a moisture barrier. This is essentially a raincoat made of Tyvek. We looked at the less expensive version available at Lowes and other hardware stores. This is like a "plastic burlap"-type woven material. But we went with the more expensive Tyvek because it seemed stronger, and because it's a true moisture barrier. There are no pores, because it's a sheet; it's not like a woven fabric. (This would really matter later, since it has taken us a lot longer than we expected to get siding on the house.) This stuff comes in rolls of 5', 8' and 10' widths. Our first floor is 10' high, the second 8', and of course you need an overlap. (Overlaps on any part of the outside of the house should be fashioned to shed water, like shingles.) So we went with 10'. You can see in the previous blog that the roofers took some sheets of this and applied it to the gables--this really saved us some effort later, since those gables are up to 26' off the ground!
We lost some shots from my phone, but here's the finished job. If I seem exaltant it's because I am! This was December. Working at heights of up to 20' on ladders while trying to steady a 40 pound roll of Tyvek, in the cold, while stretching it as tightly as possible...well, let's just say we don't want to do this again. We thank Jeb and Pat Baxter for their help with this. Sometimes it took up to 4 people to get this done. Start by striking level chalklines at the base and squaring the roll's edge on a corner, then just work...well, here, counterclockwise, as you can see by the upside-down logos.

The windows came around Thanksgiving. We're trying to save money wherever we can, but we wanted really good windows. These are Pella Pro-Lines, which have an aluminum exterior frame, and pine interior frames. They look great, and every professional that's been over to the house has said "Hmm, you got good windows!"

Here we are in early January. Notice on the left we've installed a 2nd floor window, but the larger rough opening for the big master bedroom window is to the right. This would end up being one of the last windows we installed, just because of the weight and height above ground.
And here, you can see the size of the living room window. Both the patio door and living room window here took 4 people to set and install.

I'd show more detail about installation, but the manufacturer's instructions are very clear if you decide to tackle this on your own. The most important thing is getting the frame square. Having really square rough openings cut by the SIP manufacturer really helped here.

Wednesday, January 23, 2013

Roofing.
So yes, we had professionals put up the trusses and sheathing. A wise move by the builders supervising us at this stage. What we've learned is that you have to pick your battles with things. However, in our effort to save money and do as much as we can ourselves, we did finish the roof.


Note the Tyvek attached by the roofers before the trusses went up. Smart. The "lookouts" (overhangs at the gables) were part of our original design. We think it gives the house a better look, more architectural.

Also note the single garage-roof truss attached to the north-east side of the house. This is so that later we can map out the garage lines when we add that this spring (2013).


As you can see, it's been raining. It's late October at this point, and getting the shingles on is top priority. (Those ripple-y bumps on the roof are warping roofing paper.)

My brother Patrick and I loaded the shingles onto the roof. They have a truck with a conveyor belt lift and you just keep on humpin' really heavy bundles of shingles as fast as you can, spreading them about for use later. The boards along the edge were placed by the roofers. You pull those up as you go.

Robin from Bridlewood Builders giving us tips on the use of step-flashing and roof jacks.

Here you can see how we've placed roof jacks as we work our way up. It's around November 6 of 2011.


Next: as the winter approaches, we jam on "Closing In"!

Tuesday, January 22, 2013

2012


Okay...so we haven't been so good about blogging. This is because doing it has absorbed so much of our time outside of work that we don't have time to write about it. But those who wish to see the story continue. Here's some activity since October 2012...


The view from the 2nd floor as the decking went up.

Completed 2nd floor. Then...2 weeks later...
ROOFERS! Do not attempt this without professional supervision. Very slick, this was just 8 hrs after they started. The next 2 days had the sheathing and base covering (tar paper & ice shield) in place.

Well that's enough for tonight. Want to publish, so will be back soon (promise this time!)


Friday, January 11, 2013

August 20th & 21st

Here's the first floor going up. The deck...