An update. We spent much of the last 3 days bailing out hundreds of gallons of water from the center pads, while the perimeter trench dries out after a weekend of heavy rains. This is probably the most discouraged I've been, and Julie had to bouy up my spirits as we got absolutely covered in mud, while we removed the plastic sheeting covering the footer trench--we guess it must have kept at least some of the water out, but not much.
We also finished the rebar, fixed up a few small areas, and just generally have tried to make it as pretty as possible for the codes inspector, who's coming tomorrow at 9.
We'll let you know how it goes!
(Originally posted 6/14/11. Occurred after "Rebar Adventure".)
Sunday, July 17, 2011
Wednesday, June 22, 2011
The Rebar Adventure
Julie here this time. So we were ready to put the steel rebar in the trench for the footer to reinforce the concrete, but we had to bend it first. Eric looked up on the Internet how to do it. Here’s his explanation:
http://www.youtube.com/watch?v=gg7gUl7K0Eg
Then here’s the video of us doing it:
http://www.youtube.com/watch?v=yyrliGrgntw
It was hard work, although fun making the video. We got four pieces bent. After awhile, we started making stupid mistakes because we were so tired. So we made up a new rule:
Rule 1: Always check to make sure you haven’t worked too long and gotten too tired. If you have, you will make bad decisions and/or could hurt yourself.
We decided to go home and finish the other four pieces later. Good thing we did, because after we went home and looked at the book we realized we had bent the rebar in the wrong place. This meant we would have to UN-bend it, and re-bend it correctly. Ack!!
Rule 2: Re-check your instructions before you start.
So unfortunately the next day we were both free to work it was blisteringly hot: 99°. Naturally we didn’t get started until the hottest part of the day. We unbent the four pieces and then bent all of them in the correct spot. Unbending was nearly impossible, so Eric came up with a brilliant idea. (We always come up with the brilliant ideas on the second try.) He bolted a pipe vise to a piece of wood, then drove his car over the piece of wood to hold it down. Way easier than me trying to hold it down by standing on it! It actually went really well, and was much easier using the vise. I could even do it myself:
![]()
My sister said "If you can bend steel rebar, I'd better not #*$! with you," which made the whole ordeal worthwhile. The bad part was that it was so unbelievably hot we nearly got heat stroke. We worked for an hour and a half, and then took a break for lunch, which was a good thing, because I was getting sick to my stomach. I mean, we took plenty of ice water in a cooler – some of which I poured down my back periodically, but you have to have food. After lunch we went back and finished. Yay! 16 pieces of rebar bent correctly, and placed in the trenches. Now we can pour the concrete!
P.S. You will notice I am wearing goggles. So was Eric. I read two things somewhere on the Internet: One, that steel rebar is made from low-grade steel, and therefore very brittle. They encouraged us to wear eye protection, so we did. The second thing it said was "Bending rebar is not for the faint of heart." I suppose that's true, but, you know, it really wasn't that difficult.
http://www.youtube.com/watch?v=gg7gUl7K0Eg
Then here’s the video of us doing it:
http://www.youtube.com/watch?v=yyrliGrgntw
It was hard work, although fun making the video. We got four pieces bent. After awhile, we started making stupid mistakes because we were so tired. So we made up a new rule:
Rule 1: Always check to make sure you haven’t worked too long and gotten too tired. If you have, you will make bad decisions and/or could hurt yourself.
We decided to go home and finish the other four pieces later. Good thing we did, because after we went home and looked at the book we realized we had bent the rebar in the wrong place. This meant we would have to UN-bend it, and re-bend it correctly. Ack!!
Rule 2: Re-check your instructions before you start.
So unfortunately the next day we were both free to work it was blisteringly hot: 99°. Naturally we didn’t get started until the hottest part of the day. We unbent the four pieces and then bent all of them in the correct spot. Unbending was nearly impossible, so Eric came up with a brilliant idea. (We always come up with the brilliant ideas on the second try.) He bolted a pipe vise to a piece of wood, then drove his car over the piece of wood to hold it down. Way easier than me trying to hold it down by standing on it! It actually went really well, and was much easier using the vise. I could even do it myself:

My sister said "If you can bend steel rebar, I'd better not #*$! with you," which made the whole ordeal worthwhile. The bad part was that it was so unbelievably hot we nearly got heat stroke. We worked for an hour and a half, and then took a break for lunch, which was a good thing, because I was getting sick to my stomach. I mean, we took plenty of ice water in a cooler – some of which I poured down my back periodically, but you have to have food. After lunch we went back and finished. Yay! 16 pieces of rebar bent correctly, and placed in the trenches. Now we can pour the concrete!
P.S. You will notice I am wearing goggles. So was Eric. I read two things somewhere on the Internet: One, that steel rebar is made from low-grade steel, and therefore very brittle. They encouraged us to wear eye protection, so we did. The second thing it said was "Bending rebar is not for the faint of heart." I suppose that's true, but, you know, it really wasn't that difficult.
Monday, May 30, 2011
A Solid Footing (1)
For now, the rains have passed. We have gotten quite sloppy working in the mud to finish this (southeast corner)...


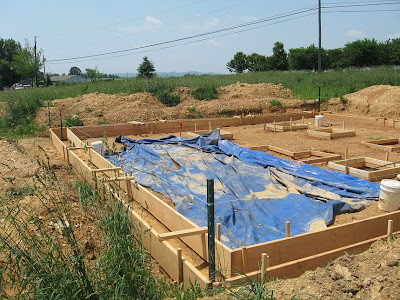

...and this (southeast side and NE/NW corners). Hard to get a full shot from these angles.

Tarps:
Have several. Even with this large one we had to bail out a couple of these holes. In the foreground of the uppermost photo, that corner was a bit too low (we are looking to have a footer w/ a base of 36-37" and a level top at 24" from grade. Some of this is, like, 41" below grade, so now (argh) we have to shovel some dirt back in. This is erosion. We thought about something like starw bales, but it actually wasn't as bad as we expected it could have been. But it will be a concern that the earth on this end is actually softer than that at the northwest side (background). Not just because of the rain and because the foreground earth is on the downhill side, but also because the earth at the opposite end is really hard. Grey and shaly in spots. If we had it to do over again, we'd have dug out another 2' outside the footer trench, especially on the northeast (upper left, nearest the shed). This would leave more room to work, help us keep the floor at a better level, and leave extra room for the French drain.
We're going to add a drain in the southeast corner; just run 2" PVC across the footer (cut w/ hole saw) at a slight downward angle, and elbow up to a drain that will emerge from the corner of the concrete crawlspace floor. We'll dump the drain into the French drain on that side.
Rebar coming Wednesday. Tip: 20' pieces are cheaper...but how to cut them? I have an angle grinder with a metal cutting blade, but we'll need juice. So either we get our old generator running (carb rebuild + fuel system flush = no dice :( ...or we have to get another generator.
But...144' of footer looking pretty level! Have to finish and stake the 2 "odd" pads seen in the center-left here, but it's coming along.

Friday, May 13, 2011
Progress
After a very wet and very busy spring (our last blog entry was in March!) we have been at it when work schedules allow. Keeping after the "prairie" took a weekend. Most of the trees survived the first winter (our spruce from Christmas looks iffy, and the dogwoods got a bit chewed up). And we've been leveling and hand cutting the foundation details, footer walls, central support piers, that sort of thing. We've made quite a bit of progress, having just a few hours here and there to get after it.


This is how it looks tonight. You can see the beginnings of the forms for the central pads, and the edging of the footer wall. Both are down to frost depth. The forms will be built up starting this weekend. They'll be higher in the upper left, where the grade is lowest, although we're filling some of that in w/ dirt from the trench. The upper right is cleanly cut, running toward the lower right of the photo. The nearest footer can't be seen in the foreground but is also cut to depth. Soon...concrete!
Tuesday, March 8, 2011
Late Winter Update
People now routinely ask: "So, how's the house coming along?"
Well for now, not at all. It's been kind of nice to have a break from it. After all, the ground has been frozen and the weather harsh, so there's not much we can do.
The main thing to work on now is drainage--the foundation has a lot of water in it as the snow has melted. I also promised a picture of the finished driveway, which is working quite well, thank you! So here it is...

And here's the "swimming pool"...

I guess we'll need a pump.
Thursday, December 30, 2010
Early Winter
It's been a couple of months but despite a sudden drop in the temps and what felt like an early winter in the fall, we have been keeping at it. In October, we cut the topsoil away and stacked it aside for later use in landscaping. We did this with the skid loader/digger when we dug the main square for the house foundation. In mid-November we had the first layer of stones out down for the gravel driveway.
 We did this because we could--it doesn't matter how cold it is when you're laying stone! Digging the details of the foundation were becoming more difficult, because the ground was beginning to freeze. When it wasn't freezing it was raining. That does make it difficult to lay stone. Our driveway may look level, but to a guy driving 30 tons of stone in a 4-axle truck, it's not a good idea (might get stuck, believe it or not). So our advice is to make sure the subsoil is dry enough. In our case, the guy came out, apologized for not being able to lay the stone, and had to come back days later when it was drier. At least they didn't charge us 2 delivery fees! But be careful to check. I think they didn't because we're amateurs and they should have asked.
What kind of stone?
We asked around and typically there's a base layer of a few inches, called "ballast", and for this we were recommended "#3s"--most stone are 3 inches (many were as much as 5"!). Here's Julie standing on the pile at the base of the driveway. We learned that these are not stones you can move with a shovel and a rake! There was also a pile of stone near the end--because live wires prevented the driver from dumping all the stone out to the end. So this required a non-toothed skid loader to move and spread the remaining stone, an expense we did not anticipate.

Here's the "after" shot. But driving on ballast isn't that great. For that we'd need the next layer. Recommended was #2a or b "modified" which means it contains mostly stones 2" or less, all the way down to "stone dust." We'll have pics of that in the next post.

How much stone? I calculated the length of the driveway (114') multiplied it by the width (12', plus a little wider at the end), by the depth desired (3" or .25 foot), came up with a cubic footage, which I divided by 27 (number of cubic feet in a square yard), and requested that cubic yardage of stone. The quarry converted that to tonnage and the result was perfect. Nothing short or left over.
We have managed to get a little foundation work done. We dug a trench and the rough cuts of the 8 pads that will be poured (when it's warm enough to pour concrete again, >40 deg F). In this photo you can see the trench is roughed in, and the pads are all but finished (by hand, to cut them straight, square and level). Our level reference is out of frame to the right, and is a steel stake driven into the corner of the hole, with a mason's string tied to the point where the pole is at grade. Then we walk a line level out (keep the string tight) and measure down with a tape. In our region, frost depth is 36", so the pad and trench bases need to be at 36" depth from grade.

In the farthest corner, we found we'd dug too deep--and prior to this photo, that corner was a lake after those rains. Without electricity and the generator not working, we had to bail the corner by hand, over 300 gallons if we calculated correctly. Our arms were tired. Here you see what we've done after we filled the muddy hole with subsoil and placed wooden 2x4 skids so we could get the loader in and clean things out.
So between the ballast stone and the mistakes on the foundation depth, that added up to needing an extra day with earth moving equipment. It wasn't super expensive (about $300), but those things add up. We'll try to be more careful.
As you can see, there's water in the pad holes, and the general state of the pit says: "nothing more until the weather improves." That's the other thing: the weather usually won't cooperate with your plans, so be flexible.
We'll post the finished driveway next time. In the meantime, this winter we're making some changes to the final plans, which we'll talk about, and starting the "Hobbit door." (You'll see!)
Monday, October 25, 2010
Getting somewhere--Part 2
Okay, it's been a while. But it became difficult to continue the blog when the building permit for the house was held up by a problem with the original subdivision. Without getting into too much detail, we could have had the permit by late July (already getting a little late for us with school starting back in a month). So the project languished while the permit was on hold while this problem was sorted out by the township, the septic enforcement officer, and the owner of the neighboring property.
It's complicated.
The take home message is that the best laid plans can fall prey to the unforeseen (and take our word for it: no one--not the township, not the neighboring property owner--saw this coming). It wasn't even a problem with our property, percs, or septic design!
Ahh! But, we are back in business. 2 weeks ago I learned how to use a Bobcat-type digger to begin the foundation. I could feel the 10-year-old in me! Tonka trucks...only for real.


So we're down about 22-35 inches--29 is target, and so now we're shaving here, filling in there to achieve a 29" depth overall. The trenches for the poured footer & pads can then down down to frost depth at 36". This was fun, but we would again have people who attempt this consider avoiding a full basement. Just getting this far has really caused us to appreciate keeping it simple.
One silver lining: we have found that the "get ready" used up more of our cash than we expected...well, admittedly we'd spent so much effort estimating the BIG costs--the SIPs, the window estimates, framing costs--that we kinda neglected the pre-building costs, like the permit itself (nearly $2000, yikes!) equipment rental, foundation materials, driveway stone, etc. So now we're feeling like having a winter to replete our cash will actually help a great deal.
Take home message #2: the little stuff adds up fast. Take your time.
Next: a driveway!

It's complicated.
The take home message is that the best laid plans can fall prey to the unforeseen (and take our word for it: no one--not the township, not the neighboring property owner--saw this coming). It wasn't even a problem with our property, percs, or septic design!
Ahh! But, we are back in business. 2 weeks ago I learned how to use a Bobcat-type digger to begin the foundation. I could feel the 10-year-old in me! Tonka trucks...only for real.


One silver lining: we have found that the "get ready" used up more of our cash than we expected...well, admittedly we'd spent so much effort estimating the BIG costs--the SIPs, the window estimates, framing costs--that we kinda neglected the pre-building costs, like the permit itself (nearly $2000, yikes!) equipment rental, foundation materials, driveway stone, etc. So now we're feeling like having a winter to replete our cash will actually help a great deal.
Take home message #2: the little stuff adds up fast. Take your time.
Next: a driveway!
Subscribe to:
Posts (Atom)